* docs/smp-server: expand tor configuration, add security practices

* docs/smp-server: add TOC

* update

---------

Co-authored-by: Evgeny Poberezkin <evgeny@poberezkin.com>
27 KiB
| title | revision |
|---|---|
| Hosting your own SMP Server | 28.05.2024 |
| Updated 28.05.2024 | Languages: EN, FR, CZ, PL |
Table of Contents
- Hosting your own SMP server
Hosting your own SMP Server
Overview
SMP server is the relay server used to pass messages in SimpleX network. SimpleX Chat apps have preset servers (for mobile apps these are smp11, smp12 and smp14.simplex.im), but you can easily change app configuration to use other servers.
SimpleX clients only determine which server is used to receive the messages, separately for each contact (or group connection with a group member), and these servers are only temporary, as the delivery address can change.
Please note: when you change the servers in the app configuration, it only affects which servers will be used for the new contacts, the existing contacts will not automatically move to the new servers, but you can move them manually using "Change receiving address" button in contact/member information pages – it will be automated in the future.
Installation
-
First, install
smp-server:-
Manual deployment (see below)
-
Semi-automatic deployment:
-
Manual installation requires some preliminary actions:
-
Install binary:
-
Using pre-compiled binaries:
curl -L https://github.com/simplex-chat/simplexmq/releases/latest/download/smp-server-ubuntu-20_04-x86-64 -o /usr/local/bin/smp-server && chmod +x /usr/local/bin/smp-server -
Compiling from source:
Please refer to Build from source: Using your distribution
-
-
Create user and group for
smp-server:sudo useradd -m smp -
Create necessary directories and assign permissions:
sudo mkdir -p /var/opt/simplex /etc/opt/simplex sudo chown smp:smp /var/opt/simplex /etc/opt/simplex -
Allow
smp-serverport in firewall:# For Ubuntu sudo ufw allow 5223/tcp # For Fedora sudo firewall-cmd --permanent --add-port=5223/tcp && \ sudo firewall-cmd --reload -
Optional — If you're using distribution with
systemd, create/etc/systemd/system/smp-server.servicefile with the following content:[Unit] Description=SMP server systemd service [Service] User=smp Group=smp Type=simple ExecStart=/usr/local/bin/smp-server start +RTS -N -RTS ExecStopPost=/usr/bin/env sh -c '[ -e "/var/opt/simplex/smp-server-store.log" ] && cp "/var/opt/simplex/smp-server-store.log" "/var/opt/simplex/smp-server-store.log.bak"' LimitNOFILE=65535 KillSignal=SIGINT TimeoutStopSec=infinity [Install] WantedBy=multi-user.targetAnd execute
sudo systemctl daemon-reload.
Configuration
To see which options are available, execute smp-server without flags:
sudo su smp -c smp-server

...
Available commands:
  init                     Initialize server - creates /etc/opt/simplex and
                           /var/opt/simplex directories and configuration files
  start                    Start server (configuration:
                           /etc/opt/simplex/smp-server.ini)
  delete                   Delete configuration and log files
You can get further help by executing sudo su smp -c "smp-server <command> -h"
After that, we need to configure smp-server:
Interactively
Execute the following command:
sudo su smp -c "smp-server init"
There are several options to consider:
-
Enable store log to restore queues and messages on server restart (Yn):Enter
yto enable saving and restoring connections and messages when the server is restarted.Please note: it is important to use SIGINT to restart the server, as otherwise the undelivered messages will not be restored. The connections will be restored irrespective of how the server is restarted, as unlike messages they are added to append-only log on every change.
-
Enable logging daily statistics (yN):Enter
yto enable logging statistics in CSV format, e.g. they can be used to show aggregate usage charts inGrafana.
These statistics include daily counts of created, secured and deleted queues, sent and received messages, and also daily, weekly, and monthly counts of active queues (that is, the queues that were used for any messages). We believe that this information does not include anything that would allow correlating different queues as belonging to the same users, but please let us know, confidentially, if you believe that this can be exploited in any way.
-
Require a password to create new messaging queues?Press
Enteror enter your arbitrary password to password-protectsmp-server, ornto disable password protection. -
Enter server FQDN or IP address for certificate (127.0.0.1):Enter your domain or ip address that your smp-server is running on - it will be included in server certificates and also printed as part of server address.
Via command line options
Execute the following command:
sudo su smp -c "smp-server init -h"

...
Available options:
  -l,--store-log           Enable store log for persistence
  -s,--daily-stats         Enable logging daily server statistics
  -a,--sign-algorithm ALG  Signature algorithm used for TLS certificates:
                           ED25519, ED448 (default: ED448)
  --ip IP                  Server IP address, used as Common Name for TLS online
                           certificate if FQDN is not supplied
                           (default: "127.0.0.1")
  -n,--fqdn FQDN           Server FQDN used as Common Name for TLS online
                           certificate
  --no-password            Allow creating new queues without password
  --password PASSWORD      Set password to create new messaging queues
  -y,--yes                 Non-interactive initialization using command-line
                           options
  -h,--help                Show this help text
You should determine which flags are needed for your use-case and then execute smp-server init with -y flag for non-interactive initialization:
sudo su smp -c "smp-server init -y -<your flag> <your option>"
For example, run:
sudo su smp -c "smp-server init -y -l --ip 192.168.1.5 --password test"
to initialize your smp-server configuration with:
- restoring connections and messages when the server is restarted (
-lflag), - IP address
192.168.1.5, - protect
smp-serverwith a passwordtest.
After that, your installation is complete and you should see in your teminal output something like this:
Certificate request self-signature ok
subject=CN = 127.0.0.1
Server initialized, you can modify configuration in /etc/opt/simplex/smp-server.ini.
Run `smp-server start` to start server.
----------
You should store CA private key securely and delete it from the server.
If server TLS credential is compromised this key can be used to sign a new one, keeping the same server identity and established connections.
CA private key location: /etc/opt/simplex/ca.key
----------
SMP server v3.4.0
Fingerprint: d5fcsc7hhtPpexYUbI2XPxDbyU2d3WsVmROimcL90ss=
Server address: smp://d5fcsc7hhtPpexYUbI2XPxDbyU2d3WsVmROimcL90ss=:V8ONoJ6ICwnrZnTC_QuSHfCEYq53uLaJKQ_oIC6-ve8=@<hostnames>
The server address above should be used in your client configuration, and if you added server password it should only be shared with the other people who you want to allow using your server to receive the messages (all your contacts will be able to send messages - it does not require a password). If you passed IP address or hostnames during the initialisation, they will be printed as part of server address, otherwise replace <hostnames> with the actual server hostnames.
Further configuration
All generated configuration, along with a description for each parameter, is available inside configuration file in /etc/opt/simplex/smp-server.ini for further customization. Depending on the smp-server version, the configuration file looks something like this:
[STORE_LOG]
# The server uses STM memory for persistence,
# that will be lost on restart (e.g., as with redis).
# This option enables saving memory to append only log,
# and restoring it when the server is started.
# Log is compacted on start (deleted objects are removed).
enable: on

# Undelivered messages are optionally saved and restored when the server restarts,
# they are preserved in the .bak file until the next restart.
restore_messages: on
expire_messages_days: 21

# Log daily server statistics to CSV file
log_stats: on

[AUTH]
# Set new_queues option to off to completely prohibit creating new messaging queues.
# This can be useful when you want to decommission the server, but not all connections are switched yet.
new_queues: on

# Use create_password option to enable basic auth to create new messaging queues.
# The password should be used as part of server address in client configuration:
# smp://fingerprint:password@host1,host2
# The password will not be shared with the connecting contacts, you must share it only
# with the users who you want to allow creating messaging queues on your server.
# create_password: password to create new queues (any printable ASCII characters without whitespace, '@', ':' and '/')

[TRANSPORT]
# host is only used to print server address on start
host: <your server domain/ip>
port: 5223
log_tls_errors: off
websockets: off
# control_port: 5224

[PROXY]
# Network configuration for SMP proxy client.
# `host_mode` can be 'public' (default) or 'onion'.
# It defines prefferred hostname for destination servers with multiple hostnames.
# host_mode: public
# required_host_mode: off

# The domain suffixes of the relays you operate (space-separated) to count as separate proxy statistics.
# own_server_domains: <your domain suffixes>

# SOCKS proxy port for forwarding messages to destination servers.
# You may need a separate instance of SOCKS proxy for incoming single-hop requests.
# socks_proxy: localhost:9050

# `socks_mode` can be 'onion' for SOCKS proxy to be used for .onion destination hosts only (default)
# or 'always' to be used for all destination hosts (can be used if it is an .onion server).
# socks_mode: onion

# Limit number of threads a client can spawn to process proxy commands in parrallel.
# client_concurrency: 32

[INACTIVE_CLIENTS]
# TTL and interval to check inactive clients
disconnect: off
# ttl: 43200
# check_interval: 3600
Server security
Initialization
Although it's convenient to initialize smp-server configuration directly on the server, operators ARE ADVISED to initialize smp-server fully offline to protect your SMP server CA private key.
Follow the steps to quickly initialize the server offline:
-
Install Docker on your system.
-
Deploy smp-server locally.
-
Destroy the container. All relevant configuration files and keys will be available at
$HOME/simplex/smp/config. -
Move your
CAprivate key (ca.key) to the safe place. For further explanation, see the next section: Server security: Private keys. -
Copy all other configuration files except the CA key to the server:
rsync -hzasP $HOME/simplex/smp/config/ <server_user>@<server_address>:/etc/opt/simplex/
Private keys
Connection to the smp server occurs via a TLS connection. During the TLS handshake, the client verifies smp-server CA and server certificates by comparing its fingerprint with the one included in server address. If server TLS credential is compromised, this key can be used to sign a new one, keeping the same server identity and established connections. In order to protect your smp-server from bad actors, operators ARE ADVISED to move CA private key to a safe place. That could be:
- Tails live usb drive with persistent and encrypted storage.
- Offline Linux laptop.
- Bitwarden.
- Any other safe storage that satisfy your security requirements.
Follow the steps to secure your CA keys:
-
Login to your server via SSH.
-
Copy the CA key to a safe place from this file:
/etc/opt/simplex/ca.key -
Delete the CA key from the server. Please make sure you've saved you CA key somewhere safe. Otherwise, you would lose the ability to rotate the online certificate:
rm /etc/opt/simplex/ca.key
Online certificate rotation
Operators of smp servers ARE ADVISED to rotate online certificate regularly (e.g., every 3 months). In order to do this, follow the steps:
-
Create relevant folders:
mkdir -p $HOME/simplex/smp/config -
Copy the configuration files from the server to the local machine (if not yet):
rsync -hzasP <server_user>@<server_address>:/etc/opt/simplex/ $HOME/simplex/smp/config/ -
Copy your CA private key from a safe place to the local machine and name it
ca.key. -
Download latest
smp-serverbinary from Github releases:curl -L 'https://github.com/simplex-chat/simplexmq/releases/latest/download/smp-server-ubuntu-20_04-x86-64' -o smp-server -
Put the
smp-serverbinary to your$PATHand make it executable:sudo mv smp-server /usr/local/bin/ && chmod +x /usr/local/bin/smp-server -
Export a variable to configure your path to smp-server configuration:
export SMP_SERVER_CFG_PATH=$HOME/simplex/smp/config -
Execute the following command:
smp-server certThis command should print:
Certificate request self-signature ok subject=CN = <your domain or IP> Generated new server credentials ---------- You should store CA private key securely and delete it from the server. If server TLS credential is compromised this key can be used to sign a new one, keeping the same server identity and established connections. CA private key location: $HOME/simplex/smp/config/ca.key ---------- -
Remove the CA key from the config folder (make sure you have a backup!):
rm $HOME/simplex/smp/config/ca.key -
Upload new certificates to the server:
rsync -hzasP $HOME/simplex/smp/config/ <server_user>@<server_address>:/etc/opt/simplex/ -
Connect to the server via SSH and restart the service:
ssh <server_user>@<server_address> "systemctl restart smp-server" -
Done!
Tor: installation and configuration
Installation for onion address
SMP-server can also be deployed to be available via Tor network. Run the following commands as root user.
-
Install tor:
We're assuming you're using Ubuntu/Debian based distributions. If not, please refer to offical tor documentation or your distribution guide.
-
Configure offical Tor PPA repository:
CODENAME="$(lsb_release -c | awk '{print $2}')" echo "deb [signed-by=/usr/share/keyrings/tor-archive-keyring.gpg] https://deb.torproject.org/torproject.org ${CODENAME} main deb-src [signed-by=/usr/share/keyrings/tor-archive-keyring.gpg] https://deb.torproject.org/torproject.org ${CODENAME} main" > /etc/apt/sources.list.d/tor.list -
Import repository key:
curl --proto '=https' --tlsv1.2 -sSf https://deb.torproject.org/torproject.org/A3C4F0F979CAA22CDBA8F512EE8CBC9E886DDD89.asc | gpg --dearmor | tee /usr/share/keyrings/tor-archive-keyring.gpg >/dev/null -
Update repository index:
apt update -
Install
torpackage:apt install -y tor deb.torproject.org-keyring
-
-
Configure tor:
-
File configuration:
Open tor configuration with your editor of choice (
nano,vim,emacs,etc.):vim /etc/tor/torrcAnd insert the following lines to the bottom of configuration. Please note lines starting with
#: this is comments about each individual options.# Enable log (otherwise, tor doesn't seem to deploy onion address) Log notice file /var/log/tor/notices.log # Enable single hop routing (2 options below are dependencies of the third) - It will reduce the latency at the cost of lower anonimity of the server - as SMP-server onion address is used in the clients together with public address, this is ok. If you deploy SMP-server with onion-only address, you may want to keep standard configuration instead. SOCKSPort 0 HiddenServiceNonAnonymousMode 1 HiddenServiceSingleHopMode 1 # smp-server hidden service host directory and port mappings HiddenServiceDir /var/lib/tor/simplex-smp/ HiddenServicePort 5223 localhost:5223 -
Create directories:
mkdir /var/lib/tor/simplex-smp/ && chown debian-tor:debian-tor /var/lib/tor/simplex-smp/ && chmod 700 /var/lib/tor/simplex-smp/
-
-
Start tor:
Enable
systemdservice and start tor. Officaltoris a bit flaky on the first start and may not create onion host address, so we're restarting it just in case.systemctl enable --now tor && systemctl restart tor -
Display onion host:
Execute the following command to display your onion host address:
cat /var/lib/tor/simplex-smp/hostname
SOCKS port for SMP PROXY
SMP-server versions starting from v5.8.0-beta.0 can be configured to PROXY smp servers available exclusively through Tor network to be accessible to the clients that do not use Tor. Run the following commands as root user.
-
Install tor as described in the previous section.
-
Execute the following command to creatae a new Tor daemon instance:
tor-instance-create tor2 -
Open the
tor2configuration and replace its content with the following lines:vim /etc/tor/instances/tor2/torrc# Log tor to systemd daemon Log notice syslog # Listen to local 9050 port for socks proxy SocksPort 9050 -
Enable service at startup and start the daemon:
systemctl enable --now tor@tor2You can check
tor2logs with the following command:journalctl -u tor@tor2 -
After server initialization, configure the
PROXYsection like so:... [PROXY] socks_proxy: 127.0.0.1:9050 own_server_domains: <your domain suffixes if using `log_stats: on`> ...
Documentation
All necessary files for smp-server are located in /etc/opt/simplex/ folder.
Stored messages, connections, statistics and server log are located in /var/opt/simplex/ folder.
SMP server address
SMP server address has the following format:
smp://<fingerprint>[:<password>]@<public_hostname>[,<onion_hostname>]
-
<fingerprint>Your
smp-serverfingerprint of certificate. You can check your certificate fingerprint in/etc/opt/simplex/fingerprint. -
optional
<password>Your configured password of
smp-server. You can check your configured pasword in/etc/opt/simplex/smp-server.ini, under[AUTH]section increate_password:field. -
<public_hostname>, optional<onion_hostname>Your configured hostname(s) of
smp-server. You can check your configured hosts in/etc/opt/simplex/smp-server.ini, under[TRANSPORT]section inhost:field.
Systemd commands
To start smp-server on host boot, run:
sudo systemctl enable smp-server.service

Created symlink /etc/systemd/system/multi-user.target.wants/smp-server.service → /etc/systemd/system/smp-server.service.
To start smp-server, run:
sudo systemctl start smp-server.service
To check status of smp-server, run:
sudo systemctl status smp-server.service

● smp-server.service - SMP server
     Loaded: loaded (/etc/systemd/system/smp-server.service; enabled; vendor preset: enabled)
     Active: active (running) since Sat 2022-11-23 19:23:21 UTC; 1min 48s ago
   Main PID: 30878 (smp-server)
     CGroup: /docker/5588ab759e80546b4296a7c50ffebbb1fb7b55b8401300e9201313b720989aa8/system.slice/smp-server.service
             └─30878 smp-server start

Nov 23 19:23:21 5588ab759e80 systemd[1]: Started SMP server.
Nov 23 19:23:21 5588ab759e80 smp-server[30878]: SMP server v3.4.0
Nov 23 19:23:21 5588ab759e80 smp-server[30878]: Fingerprint: d5fcsc7hhtPpexYUbI2XPxDbyU2d3WsVmROimcL90ss=
Nov 23 19:23:21 5588ab759e80 smp-server[30878]: Server address: smp://d5fcsc7hhtPpexYUbI2XPxDbyU2d3WsVmROimcL90ss=:V8ONoJ6ICwnrZnTC_QuSHfCEYq53uLaJKQ_oIC6-ve8=@<hostnames>
Nov 23 19:23:21 5588ab759e80 smp-server[30878]: Store log: /var/opt/simplex/smp-server-store.log
Nov 23 19:23:21 5588ab759e80 smp-server[30878]: Listening on port 5223 (TLS)...
Nov 23 19:23:21 5588ab759e80 smp-server[30878]: not expiring inactive clients
Nov 23 19:23:21 5588ab759e80 smp-server[30878]: creating new queues requires password
To stop smp-server, run:
sudo systemctl stop smp-server.service
To check tail of smp-server log, run:
sudo journalctl -fu smp-server.service

Nov 23 19:23:21 5588ab759e80 systemd[1]: Started SMP server.
Nov 23 19:23:21 5588ab759e80 smp-server[30878]: SMP server v3.4.0
Nov 23 19:23:21 5588ab759e80 smp-server[30878]: Fingerprint: d5fcsc7hhtPpexYUbI2XPxDbyU2d3WsVmROimcL90ss=
Nov 23 19:23:21 5588ab759e80 smp-server[30878]: Server address: smp://d5fcsc7hhtPpexYUbI2XPxDbyU2d3WsVmROimcL90ss=:V8ONoJ6ICwnrZnTC_QuSHfCEYq53uLaJKQ_oIC6-ve8=@<hostnames>
Nov 23 19:23:21 5588ab759e80 smp-server[30878]: Store log: /var/opt/simplex/smp-server-store.log
Nov 23 19:23:21 5588ab759e80 smp-server[30878]: Listening on port 5223 (TLS)...
Nov 23 19:23:21 5588ab759e80 smp-server[30878]: not expiring inactive clients
Nov 23 19:23:21 5588ab759e80 smp-server[30878]: creating new queues requires password
Monitoring
You can enable smp-server statistics for Grafana dashboard by setting value on in /etc/opt/simplex/smp-server.ini, under [STORE_LOG] section in log_stats: field.
Logs will be stored as csv file in /var/opt/simplex/smp-server-stats.daily.log. Fields for the csv file are:
fromTime,qCreated,qSecured,qDeleted,msgSent,msgRecv,dayMsgQueues,weekMsgQueues,monthMsgQueues
-
fromTime- timestamp; date and time of event -
qCreated- int; created queues -
qSecured- int; established queues -
qDeleted- int; deleted queues -
msgSent- int; sent messages -
msgRecv- int; received messages -
dayMsgQueues- int; active queues in a day -
weekMsgQueues- int; active queues in a week -
monthMsgQueues- int; active queues in a month
To import csv to Grafana one should:
-
Install Grafana plugin: Grafana - CSV datasource
-
Allow local mode by appending following:
[plugin.marcusolsson-csv-datasource]
allow_local_mode = true
... to /etc/grafana/grafana.ini
- Add a CSV data source:
- In the side menu, click the Configuration tab (cog icon)
- Click Add data source in the top-right corner of the Data Sources tab
- Enter "CSV" in the search box to find the CSV data source
- Click the search result that says "CSV"
- In URL, enter a file that points to CSV content
- You're done! You should be able to create your own dashboard with statistics.
For further documentation, see: CSV Data Source for Grafana - Documentation
Updating your SMP server
To update your smp-server to latest version, choose your installation method and follow the steps:
-
Manual deployment
- Stop the server:
sudo systemctl stop smp-server - Update the binary:
curl -L https://github.com/simplex-chat/simplexmq/releases/latest/download/smp-server-ubuntu-20_04-x86-64 -o /usr/local/bin/smp-server && chmod +x /usr/local/bin/smp-server - Start the server:
sudo systemctl start smp-server
- Stop the server:
-
- Execute the followin command:
sudo simplex-servers-update - Done!
- Execute the followin command:
-
- Stop and remove the container:
docker rm $(docker stop $(docker ps -a -q --filter ancestor=simplexchat/smp-server --format="\{\{.ID\}\}")) - Pull latest image:
docker pull simplexchat/smp-server:latest - Start new container:
docker run -d \
  -p 5223:5223 \
  -v $HOME/simplex/smp/config:/etc/opt/simplex:z \
  -v $HOME/simplex/smp/logs:/var/opt/simplex:z \
  simplexchat/smp-server:latest
- Stop and remove the container:
-
- Pull latest images:
docker-compose --project-directory /etc/docker/compose/simplex pull - Restart the containers:
docker-compose --project-directory /etc/docker/compose/simplex up -d --remove-orphans - Remove obsolete images:
docker image prune
- Pull latest images:
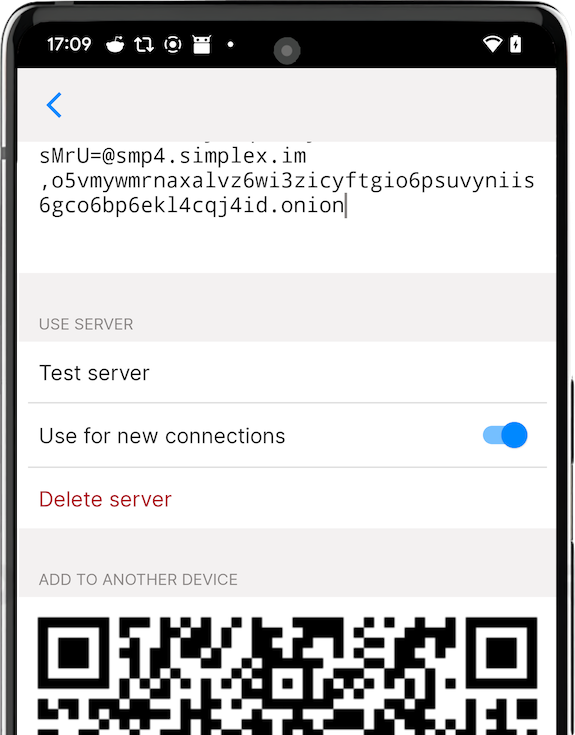
Configuring the app to use the server
To configure the app to use your messaging server copy it's full address, including password, and add it to the app. You have an option to use your server together with preset servers or without them - you can remove or disable them.
It is also possible to share the address of your server with your friends by letting them scan QR code from server settings - it will include server password, so they will be able to receive messages via your server as well.
Please note: you need SMP server version 4.0 to have password support. If you already have a deployed server, you can add password by adding it to server INI file.